Multibody vehicles
library/MultiBodyVehicle is a vehicle-dynamics library built on the Modelica Standard
Library's Modelica.Mechanics.MultiBody: suspension corners from hardpoints, a tyre that
can lift off, rig actuators and a full 6-DOF car. Its nine examples run from suspension
kinematics to a full car on a seven-post rig, each with a 3-D animation, and all nine
match OpenModelica.
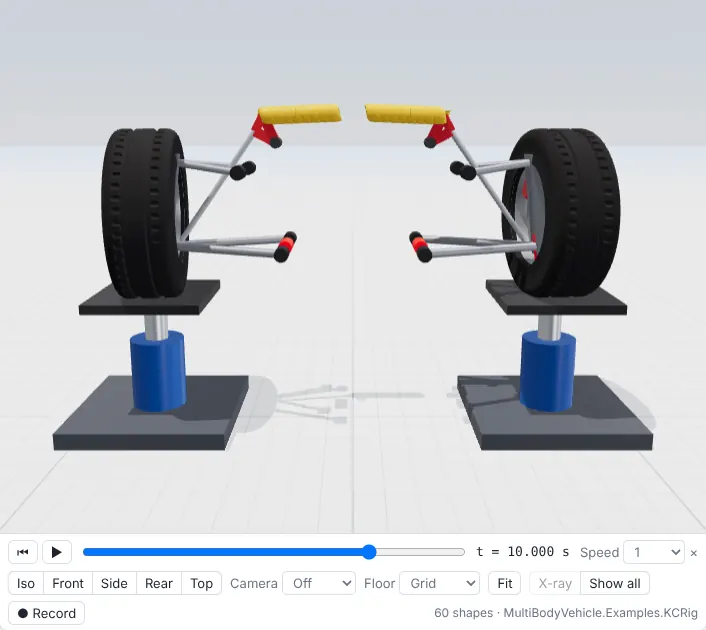
KCRig: a front axle with pushrod double wishbones and an anti-roll bar on two wheel pads, in bounce, roll and steer.
Running the examples
In the workbench the MSL is already loaded: open the library/MultiBodyVehicle folder of
a checkout or release with Library, pick an example under
MultiBodyVehicle.Examples, press ▶ Simulate, and the Animation view replays it
(see 3-D animation).
On the command line, put MSL 4.1.0 on the source path:
MSL=path/to/ModelicaStandardLibrary   # git clone -b v4.1.0 https://github.com/modelica/ModelicaStandardLibrary
./target/release/daedalus test-library $MSL/Modelica $MSL/ModelicaServices $MSL/Complex.mo \
    library/MultiBodyVehicle -m MultiBodyVehicle
./target/release/daedalus simulate $MSL/Modelica $MSL/ModelicaServices $MSL/Complex.mo \
    library/MultiBodyVehicle -m MultiBodyVehicle.Examples.StepSteer -o stepsteer.mat
The library ships CAD meshes for a treaded tyre, a five-spoke rim, brake disc and caliper,
an open-wheel body and a road bump in Resources/Shapes (made by generate.py there).
They are visuals only and do not change the dynamics.
Components
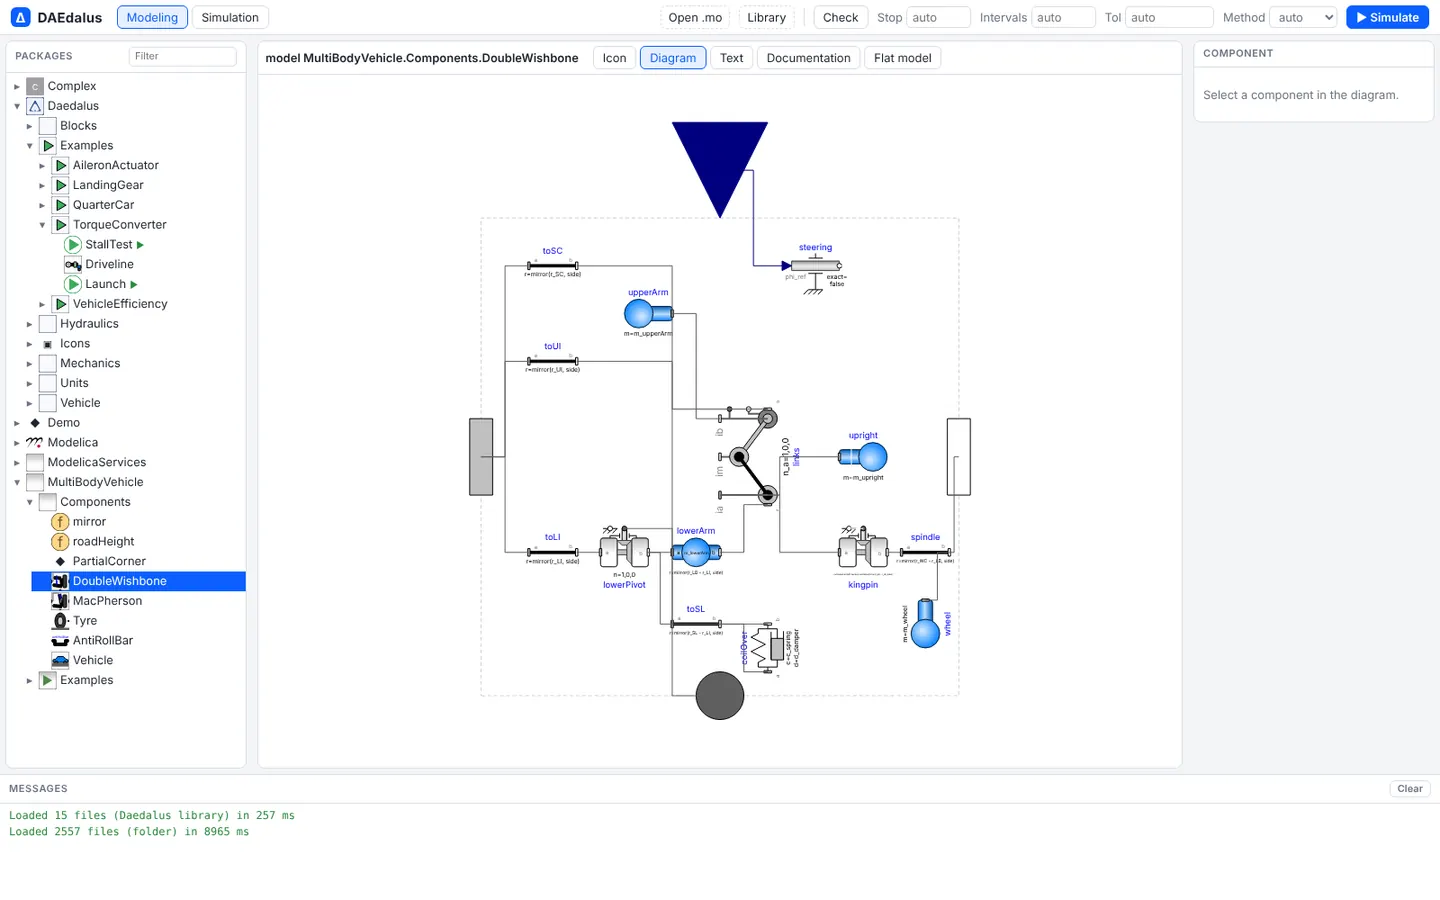
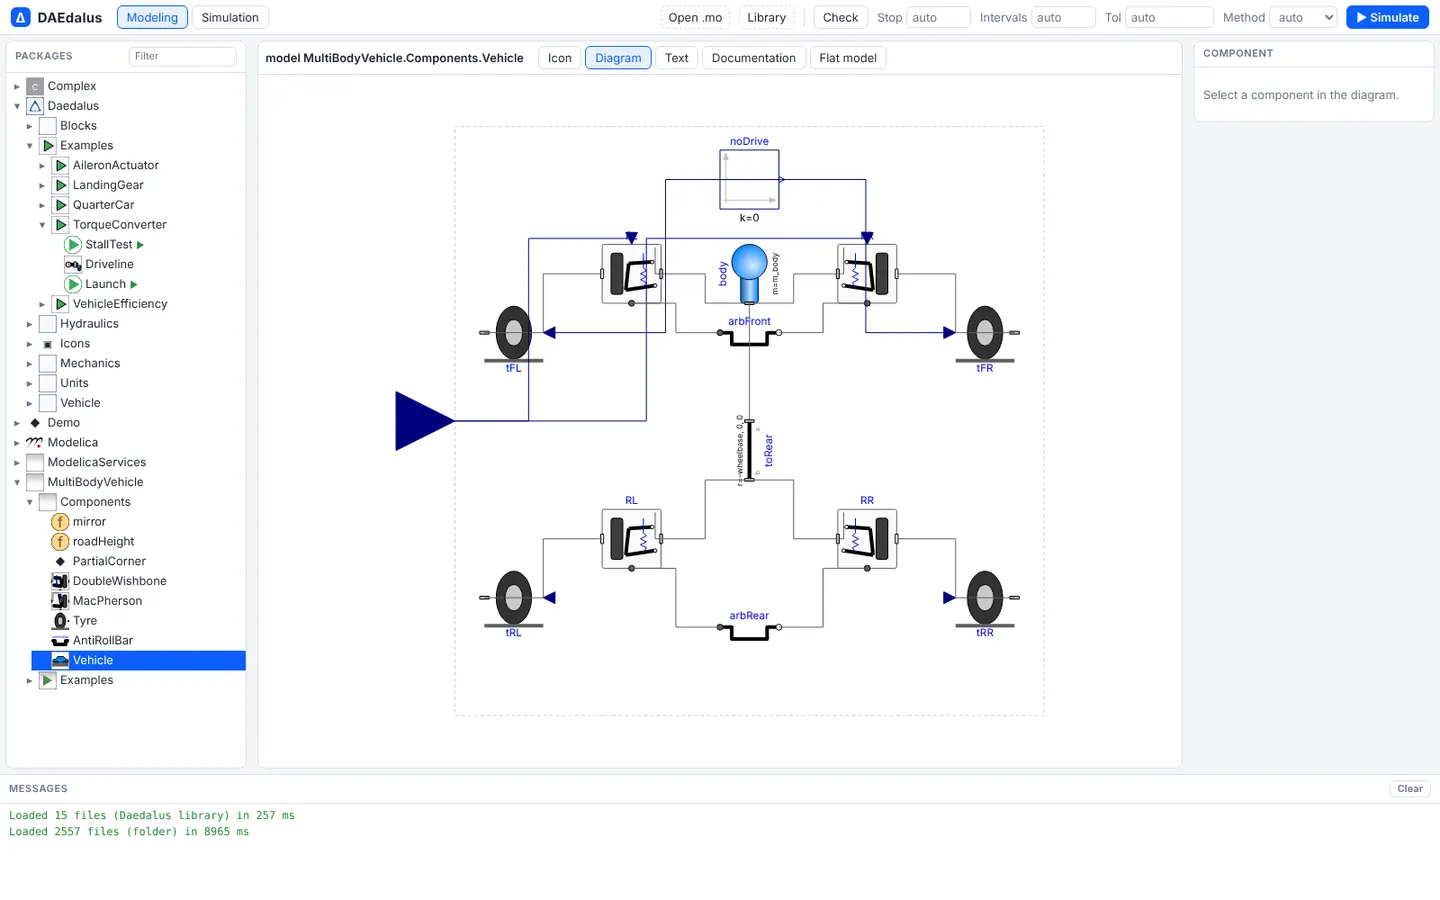
DoubleWishbone: a short-long-arm corner from hardpoints, with an external coil-over on the lower arm and a steerable upright. The loop is closed analytically by aJointRRR, so a corner adds one state pair and no constraint equations.DoubleWishbonePushrod: the same linkage with an internal spring: a pushrod from the lower arm turns a bell-crank rocker that compresses a coil-over lying across the chassis. A secondJointRRRcloses the pushrod loop, so it still has one state pair.Multilink: a five-link rear corner (two upper links, two lower links, toe link) built elasto-kinematically: the upright is a free body and each link is aCompliantLink, a stiff axial spring with ball-joint ends (10 kN/mm).WheelPadandAeroLoader: the hydraulic wheel pad and the pull-down actuator of a post rig.Tyre(usePad=true)stands on a pad, andVehicle(onRig=true)puts all four tyres on pads.MacPherson: a strut on a top-mount hinge with a lower control arm, closed by aRevolutePlanarLoopConstraint.Tyre: a point contact that can lift off, with a Pacejka-type lateral force and rolling resistance applied at the contact patch.AntiRollBar: a torsion bar between the left and right lower-arm pivots.Vehicle: a free 6-DOF sprung body on four double-wishbone corners, with front steering, anti-roll bars and a rear-axle speed controller. It starts in static equilibrium at design ride height.
Examples
| Example | What it shows | States | CPU |
|---|---|---|---|
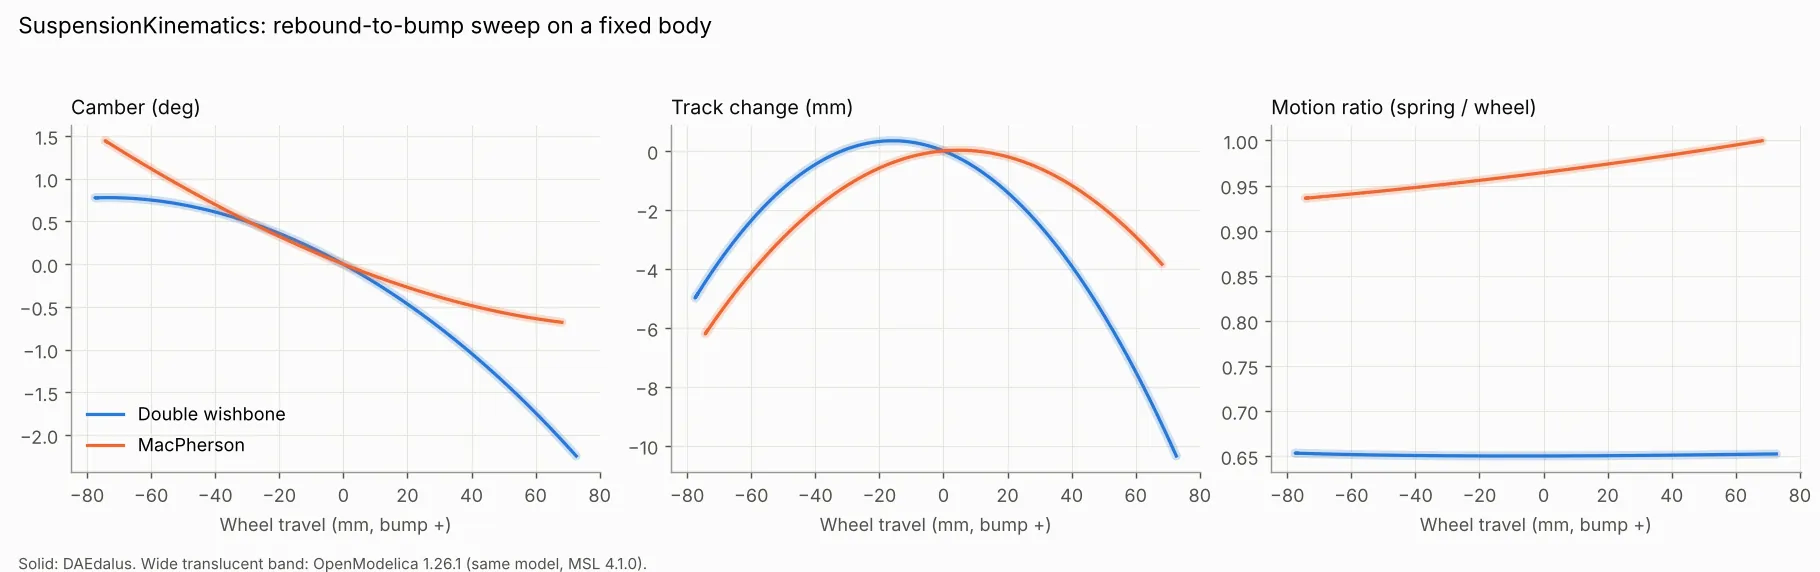
| SuspensionKinematics | Camber, track change and motion ratio over ±75 mm travel, double wishbone vs MacPherson | 6 | 0.4 s |
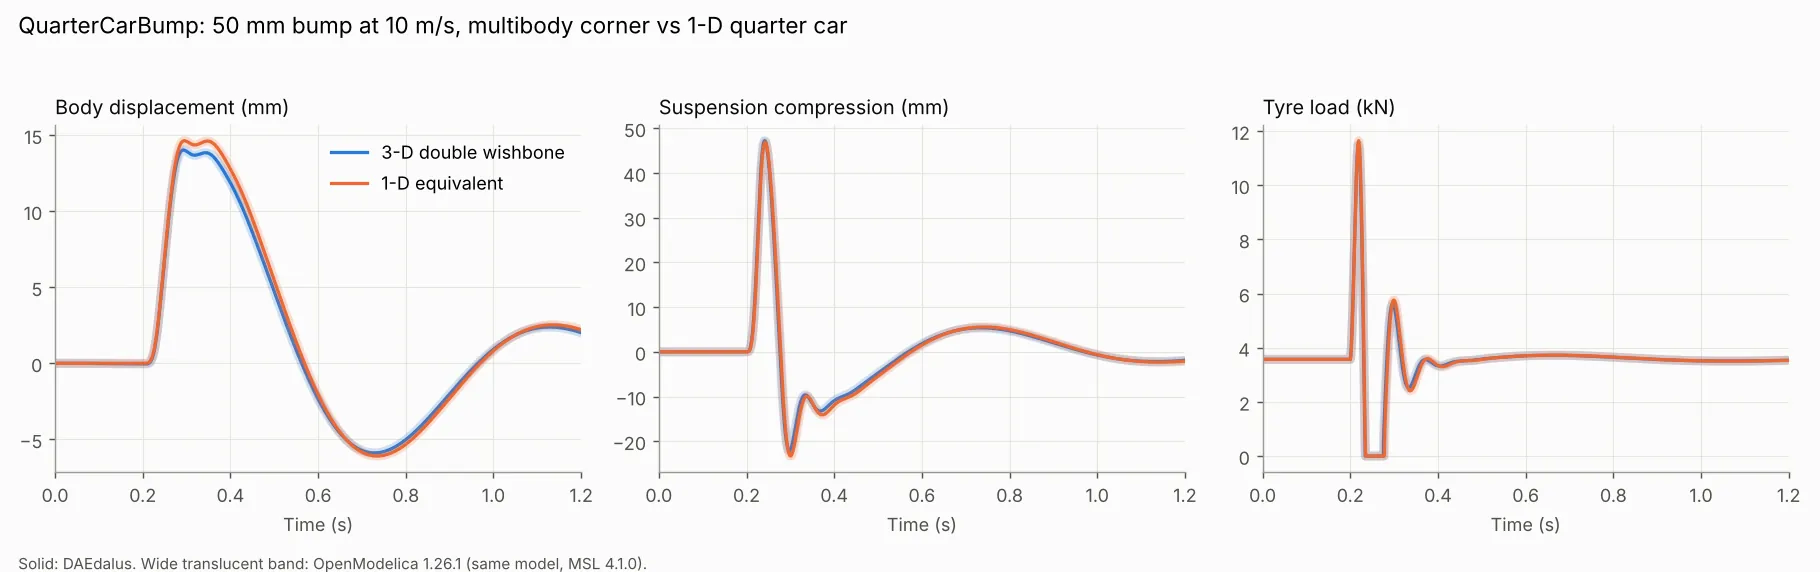
| QuarterCarBump | 3-D corner vs a 1-D quarter car with the equivalent wheel rate over a 50 mm bump | 10 | 0.4 s |
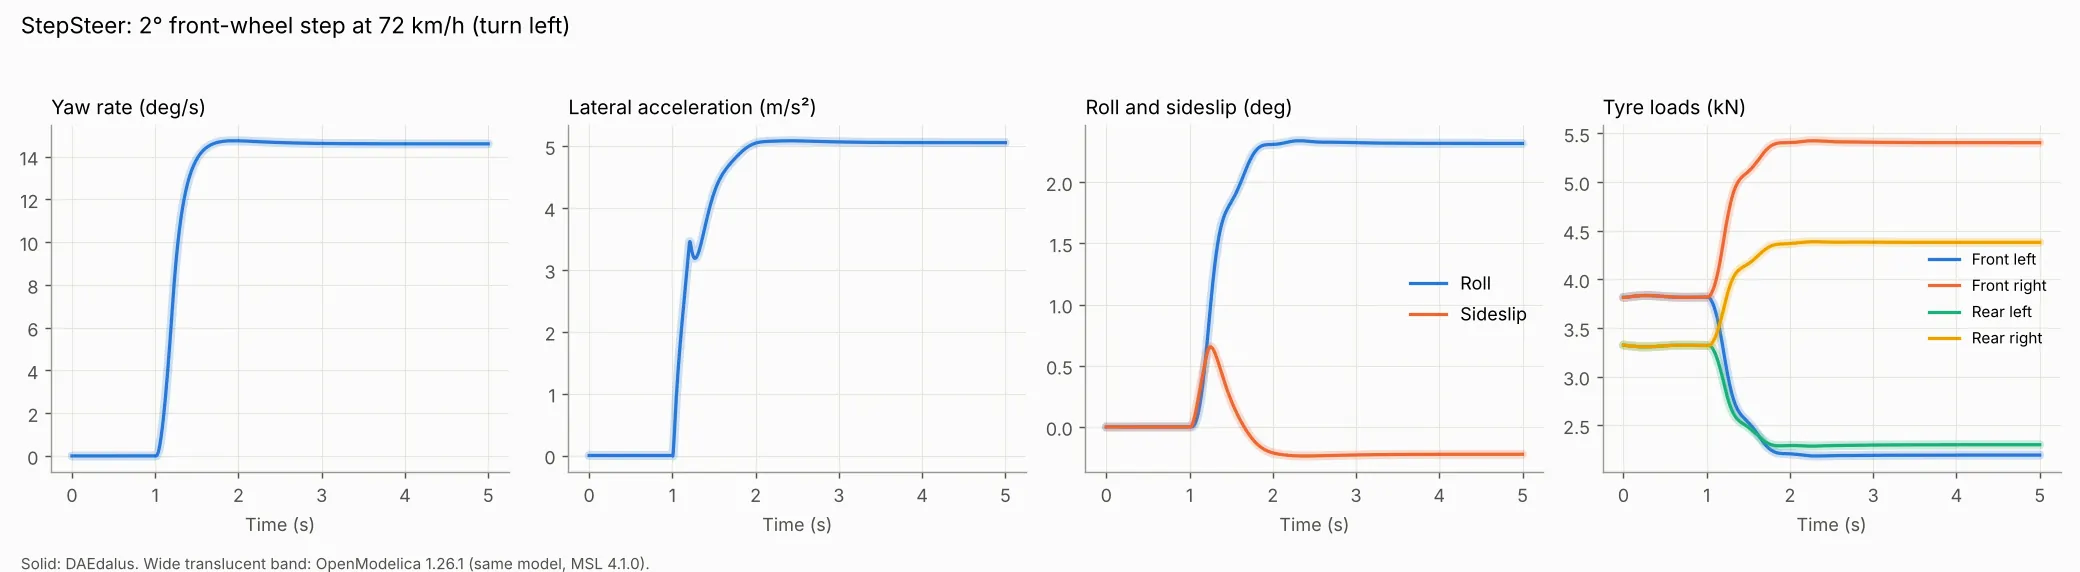
| StepSteer | 2° front-wheel step at 72 km/h | 28 | 2.1 s |
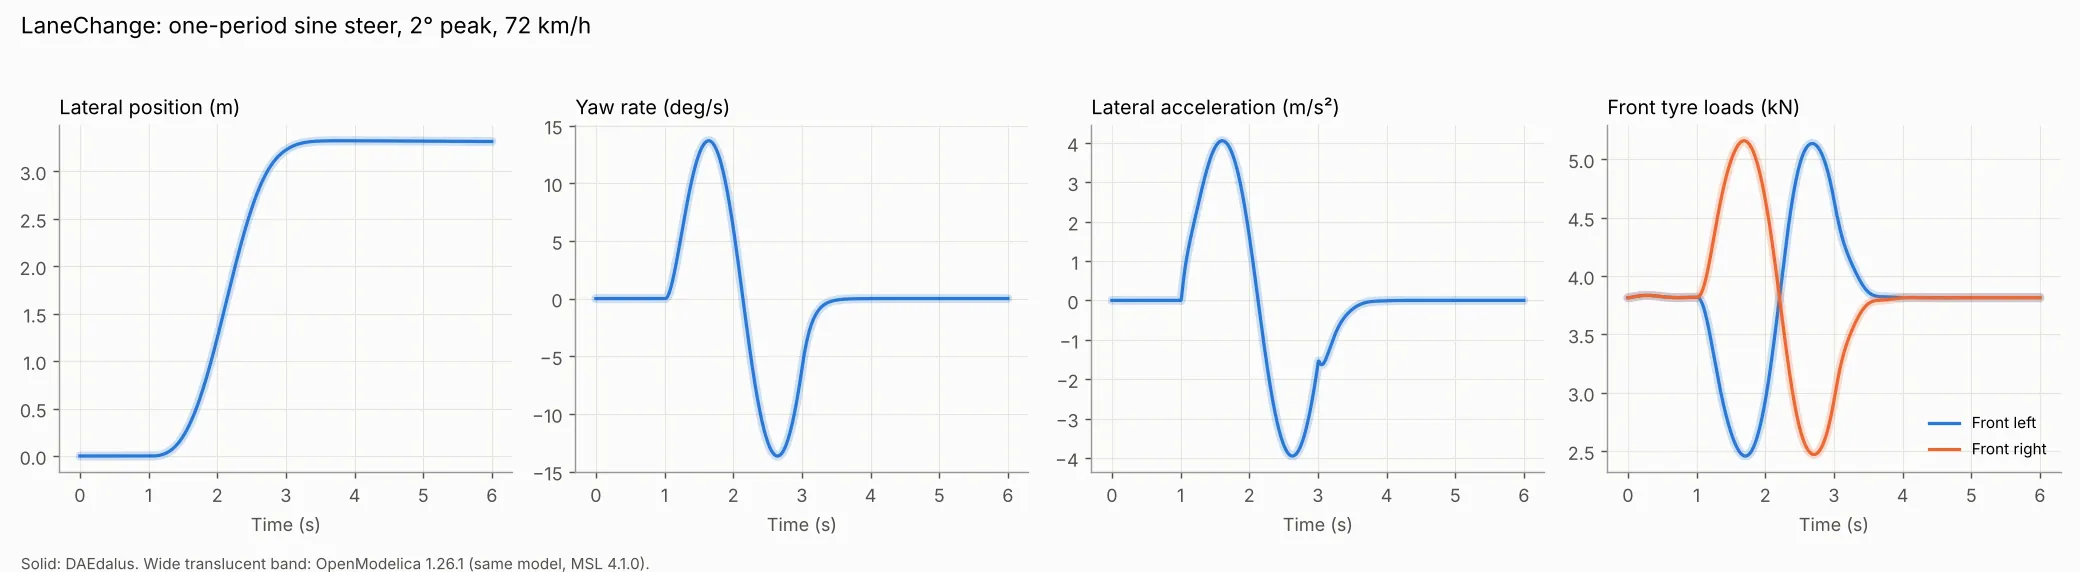
| LaneChange | One-period sine steer, 2° peak, at 72 km/h | 28 | 2.6 s |
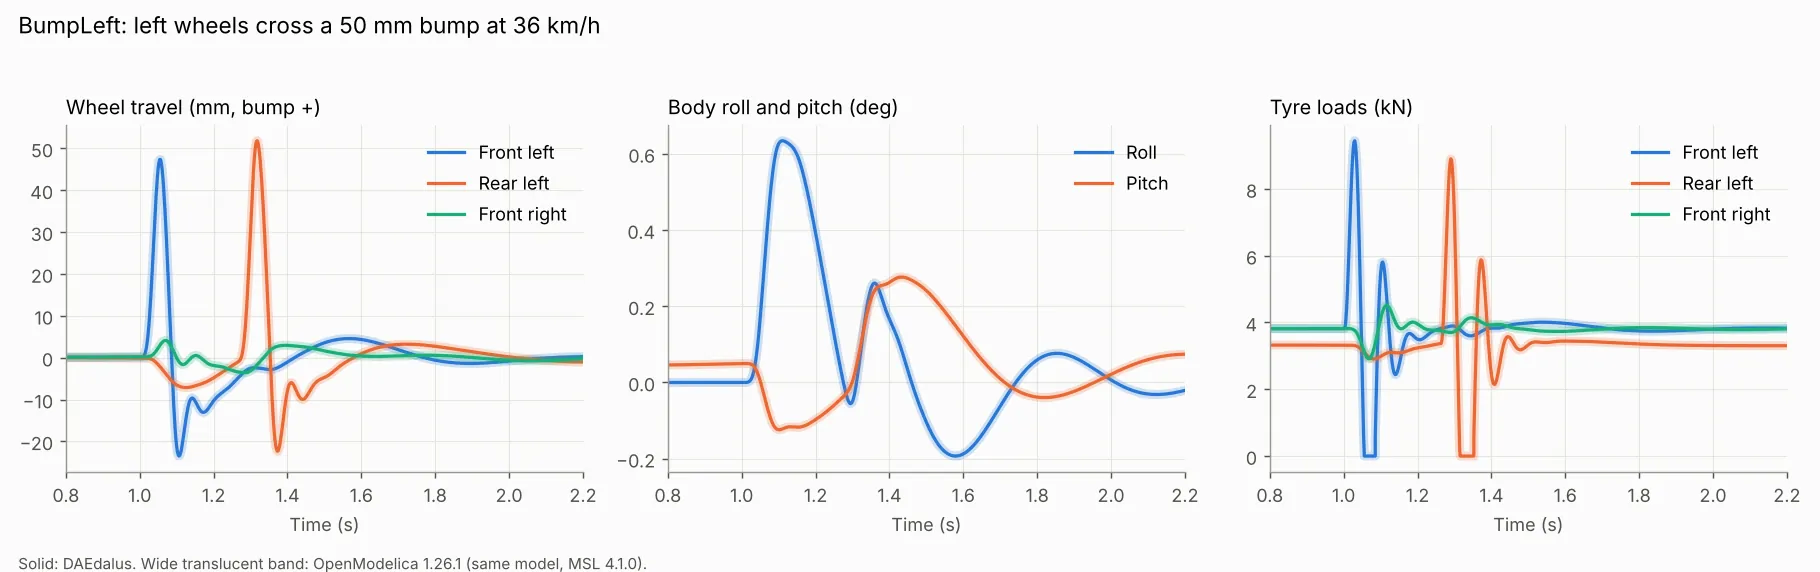
| BumpLeft | Left wheels cross a 50 mm bump at 36 km/h | 28 | 2.6 s |
| PushrodVsCoilOver | External coil-over vs pushrod, rocker and internal coil-over over ±75 mm | 6 | 0.2 s |
| MultilinkRig | Five-link corner on one wheel pad, ±70 mm bounce | 15 | 0.1 s |
| KCRig | Front axle with pushrod corners and anti-roll bar on two pads: bounce, roll, steer | 14 | 0.7 s |
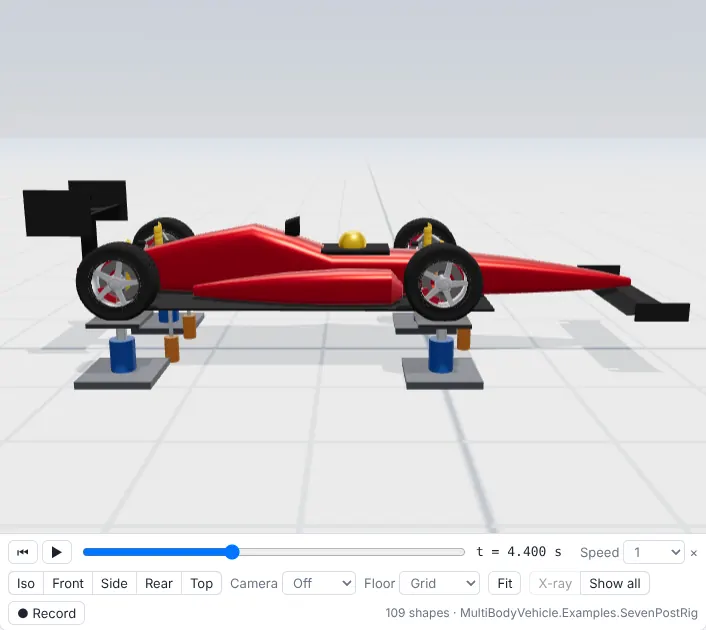
| SevenPostRig | Full car on four wheel pads and three aero loaders: heave, pitch, roll, warp | 36 | 3.2 s |
SuspensionKinematics
The double wishbone gains 2.2° negative camber at +73 mm bump (−21°/m at design) with a near-constant 0.65 motion ratio. The MacPherson strut gains 0.7°, with a motion ratio from 0.94 to 1.0.
QuarterCarBump
The 3-D corner and the 1-D model with wheel rate c·MR²
agree to 0.4 mm in peak suspension travel (47 mm) and to 1.5 % in peak tyre
load (11.5 vs 11.6 kN). Both tyres leave the road behind the crest.
StepSteer
The car settles at 14.6°/s yaw rate, 0.52 g and 2.3° roll.
The linear bicycle model is neutral steer for this tyre, giving v/L =
7.7 1/s; the multibody yaw gain is 7.5 1/s at 0.1° and 7.3 1/s at 2°.
LaneChange
The car moves 3.3 m sideways and ends on its original heading, with lateral acceleration peaks of ±0.4 g.
BumpLeft
The front-left and rear-left wheels travel 47 and 52 mm, 0.26 s apart. The body rolls 0.6°, and each left tyre leaves the road for about 40 ms behind the crest.
PushrodVsCoilOver
The outboard coil-over has a near-constant 0.65 motion ratio. The rocker gives a rising rate: 0.70 in full rebound, 0.82 at design and 1.00 at full bump, so the wheel rate doubles from 15 to 30 kN/m over the travel with one linear spring.
MultilinkRig
−20°/m camber gain (+1.0° at −60 mm, −1.5° at +60 mm), and bump steer within 0.05° in kinematics; with the bushes loaded the toe stays between −0.44° and +0.06°. Under the static 3.4 kN load the links give 0.24° of compliance toe-out.
KCRig
In bounce the bar does not twist and the wheel gains −1.1° camber at +43 mm. In roll (±27 mm per side) the bar carries ±475 N·m and the pad loads split 5.8 / 2.0 kN.
SevenPostRig
The 3.3 kN of aero load lowers the body 42 mm. The 12 mm, 1.5 Hz pad bursts excite ±18 mm of body heave, ±0.8° of pitch and ±1.8° of roll, all near resonance. Warp barely moves the body (±0.4° roll) but swings each tyre load by about ±470 N.
Checked against OpenModelica
All nine match OpenModelica 1.26.1 running the same models on MSL 4.1.0: the 98th-percentile difference is below 0.04 % of each signal's range (below 0.01 % for the four rigs). The only larger point errors are single samples at tyre lift-off and touchdown. In OpenModelica the full-car examples take 7 to 16 s of simulation time, against 1.1 to 2.0 s in DAEdalus (including the animation shapes).